
There are a lot of excellent tutorials out there on developing extensions for WooCommerce. There are also quite a few on the WordPress Plugin Boilerplate. However, I couldn’t find a good reference for extending WooCommerce with the WordPress Plugin Boilerplate.
This was a fun learning experience for me, so I decided to document the steps here in case they help someone else. I’ve included code samples as well as a link to a repository you can clone for your own use.
Note: this article assumes you have a local instance of WordPress set up. For us poor Windows users, Themeisle has a great tutorial on installing XAMPP and WordPress locally.
You can certainly follow this article without local testing; you’ll just have to skip those steps.
One more thing: since one of the early steps in this article is to test whether or not our new plugin can detect if WooCommerce is installed, my development site does not have WooCommerce installed. We’ll install it a bit later.
Right, let’s get started!
First things first: let’s grab a copy of the WordPress Plugin Boilerplate. You can clone it from GitHub, but I love the done-for-you generator Enrique Chávez put together.
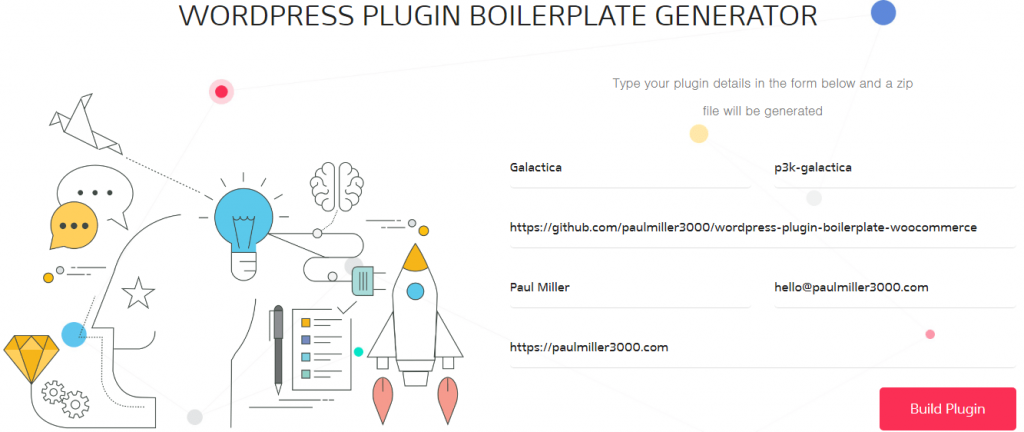
Open the generator and enter the requested information. For this tutorial, I’ve entered the following values:
- Plugin Name: Galactica
- Plugin Slug: p3k-galactica
- Plugin Uri: https://github.com/paulmiller3000/wordpress-plugin-boilerplate-woocommerce
- Author Name: Paul Miller
- Author Email: hello@paulmiller3000.com
- Author Uri: https://paulmiller3000.com
Your screen should look something like this:
Click Build Plugin, then download the ZIP file.
I like to do my initial plugin development directly inside a local instance of WordPress. Once I’ve got a workable version, I’ll move development to a separate source folder.
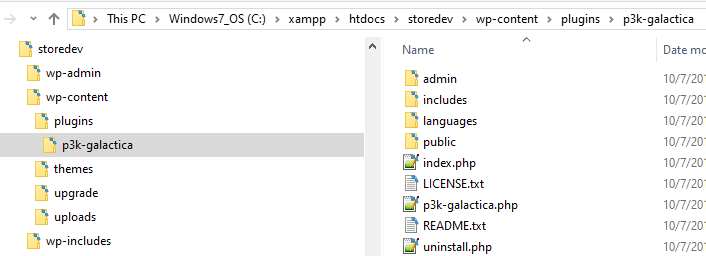
With that in mind, extract the folder from the ZIP archive you downloaded from the generator and copy it to your test site’s “wp-content/plugins” directory. This should ensure the folder name matches the plugin slug you entered earlier.
If you’ve extracted the right folder and installed it at the right location, you should see something like the following, albeit with a name other than “p3k-galactica:”
At this point, we actually have a plugin! Not that it does much but hey, it’s a start.
Log in to your local site’s admin dashboard and verify your new plugin is there:
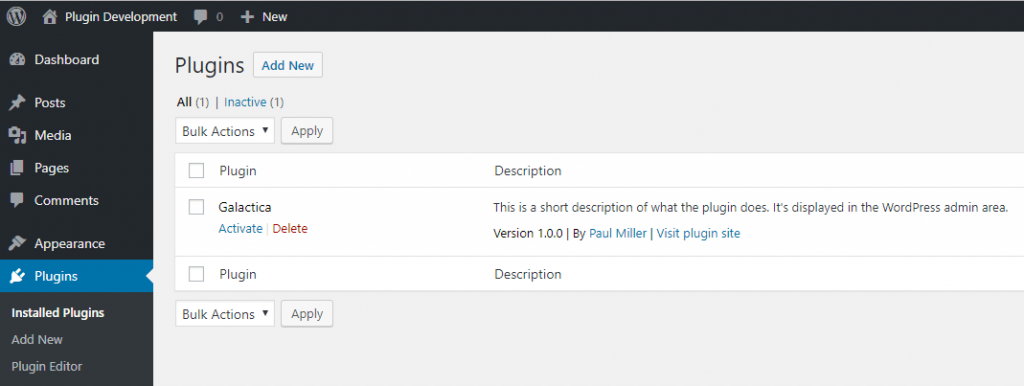
If it’s not there, make sure you extracted the correct files into the correct location in WordPress. If that doesn’t work, just generate a new plugin from wppb.me and try again.
From this point on in our development, I’ll be using my file names (e.g., “p3k-galactica.php”). Just substitute my name for yours and you should be good to go.
Let’s start our actual development by having our plugin check for WooCommerce, in keeping with Woo’s guidance (and good development practice). verifying that WooCommerce is installed.
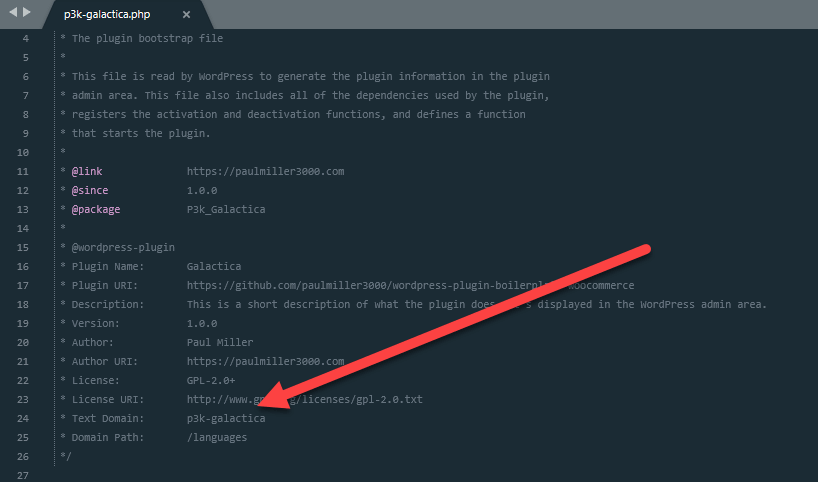
Open p3k-galactica.php in your plugin’s root folder (/wp-content/plugins/p3k-galactica). Scroll down until you find the line define( ‘P3K_GALACTICA_VERSION', ‘1.0.0’ ); which was line 38 as of the writing of this article.
Add the if statement and the following two functions immediately after the version definition and before function activate_p3k_galactica():
Before we go on, let’s make note of a few things:
- It’s a really good idea to preface all of your functions with some type of unique identifier. This helps avoid naming conflicts in the crowded WordPress plugin development space. Since my plugin is called “p3k-galactica,” I’m using the prefix “p3kg.”
- “p3k-galactica” in line 19 of the gist above is my plugin’s text domain name. You’ll see this frequently throughout the plugin, so be sure to change mine to yours. You can find yours here:
The first function checks to see if WooCommerce is installed. If it is, the function returns true to the calling function (which we haven’t created yet). If it’s not, it adds an action to display a message, then returns false to the calling function.
The second function displays the actual message.
Now, scroll down to the bottom and locate the function run_p3k_galactica. Let’s wrap the two statements inside the function with a call to p3kg_check_requirements, like so:
Now, my initial plan had been to block plugin activation if WooCommerce was not installed. However, everything I tried resulted in either an ugly die() type message, or left the plugin deactivated but returned WordPress’s “plugin activated” message.
Then I found this message from a StackOverflow user. It turns out to be better WordPress practice to leave the plugin active but disable all functionality and persist an admin banner.
By adding an action to admin_notices, we display a notice across all WordPress admin dashboard pages until WooCommerce is installed or the plugin is deactivated.
The first two functions make that happen, and modifying run_p3k_galactica disables plugin functionality.
Here’s what the full p3k-galactica.php file should look like:
I cleaned up a few extra line breaks, but it’s otherwise unchanged from the examples above.
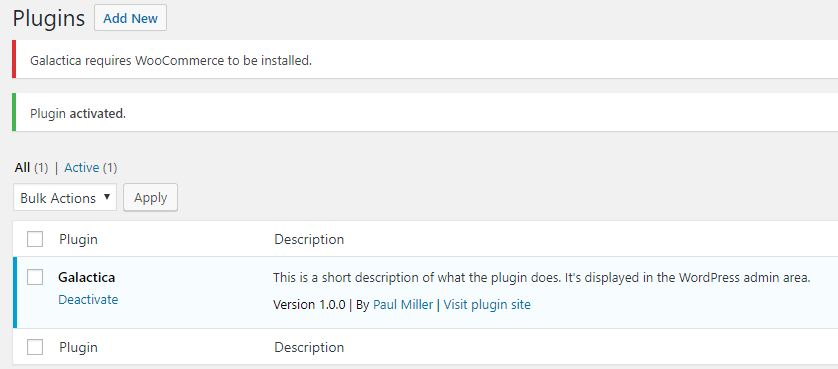
Go ahead and save your work, then test it by activating your plugin. You should see something like this:
Now would be a good time to save a copy of your work outside of your development site. You can either make a backup of the project or do like the rest of the cool kids and check your version into GitHub.
My copy is here: https://github.com/paulmiller3000/wordpress-plugin-boilerplate-woocommerce. Feel free to reference and fork it to your heart’s content.
Let’s go ahead and install WooCommerce. Pick the default options and create a product or two if you’d like.
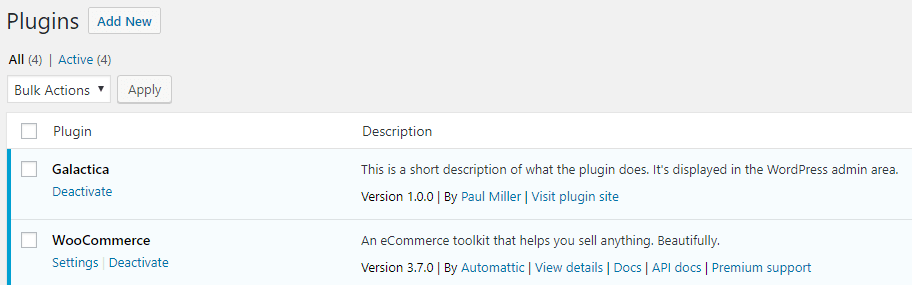
Now, let’s make sure the warning about the missing WooCommerce dependency has cleared. If you left the plugin activated after our last step, the admin notice should have disappeared after you activated WooCommerce. If you deactivated your plugin, go ahead and activate it.
You should have at least two plugins installed and activated with no warning message about a missing WooCommerce dependency:
Awesome!
Alright, let’s add some settings. For this tutorial, we’re going to create a new tab with two sections and some settings.
First, create a new file in the admin folder named “class-p3k-galactica-wc-settings.php.” We’re going to extend the WC_Settings_Page class, so paste in the following code:
Now, this won’t actually do anything until we instantiate it. However, we don’t want to instantiate our new class until after WooCommerce — and, more specifically, the WC_Settings_Page — is loaded.
So, we’ll use the guidance from this StackExchange answer and customize it to take advantage of the boilerplate’s filters.
Open /admin/class-p3k-galactica-admin.php. Scroll to the bottom and add the following function just after the closing curly brace of public function enqueue_scripts:
The boilerplate has built in functions to add actions and add filters. So, open includes/class-p3k-galactica.php and find the private function define_admin_hooks. Add a filter below the two add_action lines like this:
Save all of your changes and return to your development site. Navigate to WooCommerce > Settings.You should see your new tab at the end. Go ahead and click on it.
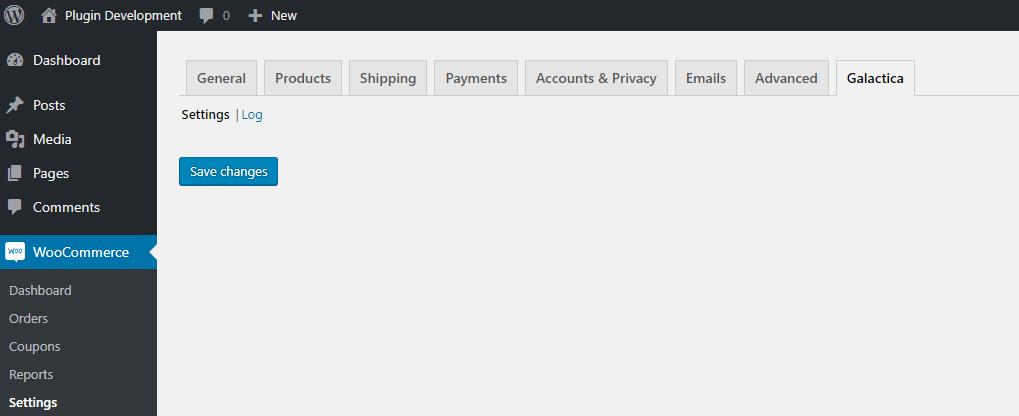
We don’t have any options yet, but that’s okay because we’ll add them next. For now, celebrate adding your own settings tab!

Go ahead and check in your code. It would suck to accidentally deactivate AND delete your plugin now!
Word.
Let’s add some settings to the first tab. I like to keep my code as clean and organized as possible, so we’ll add the actual code snippet with our settings to the partials folder.
Create a new file in admin/partials named “p3k-galactica-settings-main.php.” Add the following code:
Tip of the hat to Goran Jakovljevic, whose class-wpgens-raf-settings.php prompted me to add a prefix to each of our settings and showed me how to create the select control.
In order to actually use these settings, we’ll need to update our P3k_Galactica_WC_Settings class. Locate the get_settings function and update the default case to match the following:
Save everything and return to your new tab in WooCommerce Settings. Refresh the page.
Voilà!
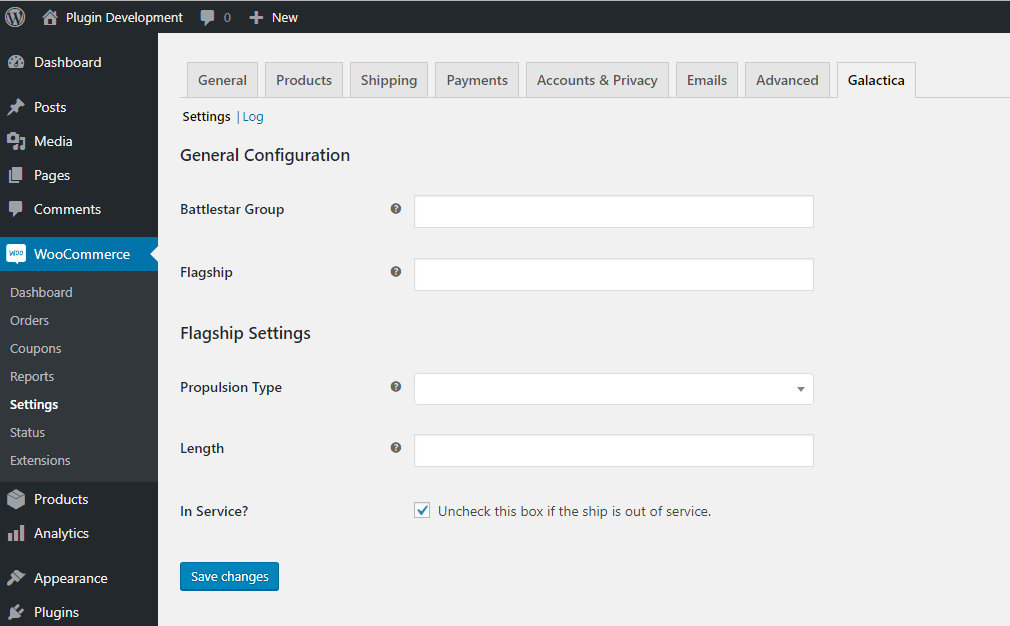
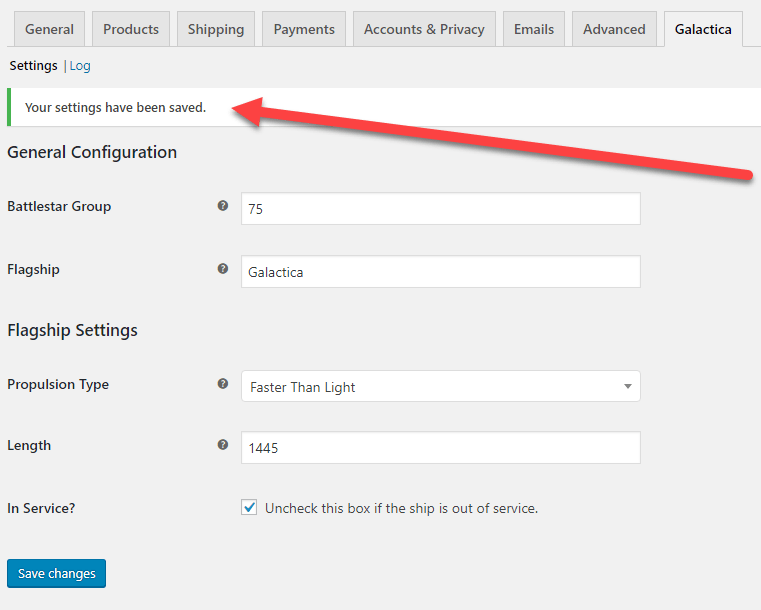
This example includes a text field, a numeric field, a select box with a few options, and a checkbox. These field types should cover most use cases.
The cool thing about extending Woo’s class is that saving is handled for us. Go ahead and enter values in the various fields, then click Save. You should be rewarded with a view like this:
You can do the same thing with the Log section, creating a new file under includes and creating arrays with your settings.
But let’s leave that one empty for now. A use case I needed to explore was adding a table to one of these sections to display the results of a query. In our next step, we’ll create a section that returns content other than settings so we can extend our functionality further.
But first, remember to check in your code!
Let’s go ahead and create our third section. The first step should be familiar to you. Add a new section to the array in our get_sections function:
Now, instead of adding a case statement to our get_settings function, we’ll modify our output function to handle the new section. Here’s how our new output function should look:
Let’s create the page. Create a new file in admin/partials named “p3k-galactica-settings-results.php.” Paste in the following contents:
That’s it! You can stop here and refresh your WooCommerce settings, checking out the Sale Results section:
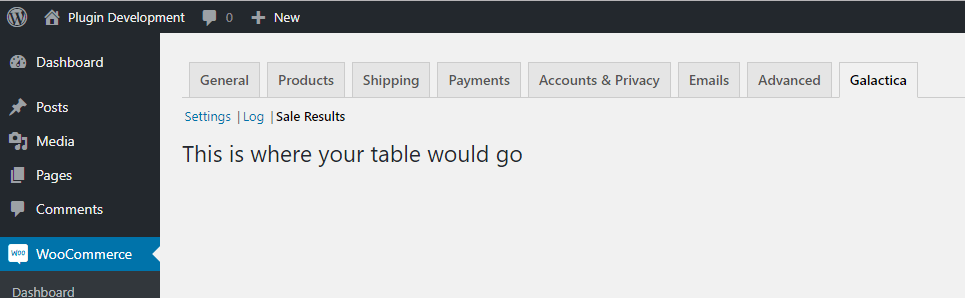
There it is: a plain old section with nothing exciting. We could add some content here, but that’s a topic for another (large) article. For now, this shows that you can add a non-settings page to the WooCommerce dashboard.
That’s a wrap! I hope you found this helpful. I’m grateful to all of the folks I’ve mentioned throughout this article, as I pulled from a number of different sources to make this work.
You can view my full version of the repository here: https://github.com/paulmiller3000/wordpress-plugin-boilerplate-woocommerce.
If you have any suggestions or run into problems, let me know in the comments.
Also published on medium.com.